게시글 서비스 클래스 만들기
package com.study.domain.post;

import lombok.RequiredArgsConstructor;
import org.springframework.stereotype.Service;
import org.springframework.transaction.annotation.Transactional;

import java.util.List;

@Service
@RequiredArgsConstructor
public class PostService {

    private final PostMapper postMapper;

    /**
     * 게시글 저장
     * @param params - 게시글 정보
     * @return Generated PK
     */
    @Transactional
    public Long savePost(final PostRequest params) {
        postMapper.save(params);
        return params.getId();
    }

    /**
     * 게시글 상세정보 조회
     * @param id - PK
     * @return 게시글 상세정보
     */
    public PostResponse findPostById(final Long id) {
        return postMapper.findById(id);
    }

    /**
     * 게시글 수정
     * @param params - 게시글 정보
     * @return PK
     */
    @Transactional
    public Long updatePost(final PostRequest params) {
        postMapper.update(params);
        return params.getId();
    }

    /**
     * 게시글 삭제
     * @param id - PK
     * @return PK
     */
    public Long deletePost(final Long id) {
        postMapper.deleteById(id);
        return id;
    }

    /**
     * 게시글 리스트 조회
     * @return 게시글 리스트
     */
    public List<PostResponse> findAllPost() {
        return postMapper.findAll();
    }
}
@RequiredArgsConstrucor 란?
해당 어노테이션은 클래스 내에 final로 선언된 모든 멤버 변수의 생성자를 만들어준다.
과거 레거시 때에는 @Autowired, @inject 등을 통해 빈을 주입시켰는데, 스프링은 생성자로 빈을 주입시키는 것을 권장한다고 한다.
게시글 서비스 테스트 코드 작성
package com.study;

import com.study.domain.post.PostRequest;
import com.study.domain.post.PostService;
import org.junit.jupiter.api.Test;
import org.springframework.beans.factory.annotation.Autowired;
import org.springframework.boot.test.context.SpringBootTest;

@SpringBootTest
public class PostServiceTest {

    @Autowired
    PostService postService;

    @Test
    void save() {
        PostRequest params = new PostRequest();
        params.setTitle("게시글 제목 테스트");
        params.setContent("게시글 내용 테스트");
        params.setWriter("tester");
        params.setNoticeYn(false);
        Long id = postService.savePost(params);
        System.out.println("생성된 게시글 ID : " + id);
    }
}
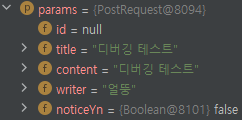
id 값이 null 이 뜨는 이유 :
현재 pk인 id 값이 auto_increment 에 의해 자동으로 1씩 증가하며 생성되는데, 이렇게 생성된 pk를 객체에 담아주려면 MyBatis의 "useGeneratedKeys" 기능을 이용해야함!
"useGeneratedKeys" 기능 사용
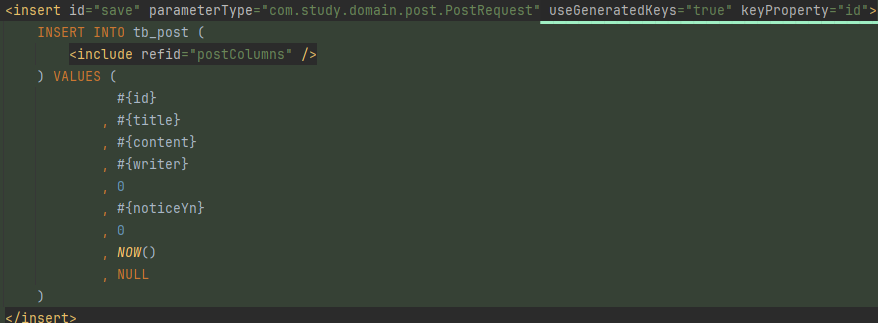
이미 XML Mapper에 작성했던 쿼리 중 게시글 저장 부분의 속성을 추가한다. (밑줄친 코드)
useGeneratedKeys를 true로 설정하게 되면
게시글의 PK가 parameterType에 선언된 Request객체(params)에 저장 되고,
keyProperty에 선언된 id에 값이 매핑된다.

게시글 컨트롤러 작성하기
@Controller
@RequiredArgsConstructor
public class PostController {

    private final PostService postService;

    // 게시글 작성 페이지
    @GetMapping("/post/write.do")
    public String openPostWrite(Model model) {
        return "post/write";
    }
}
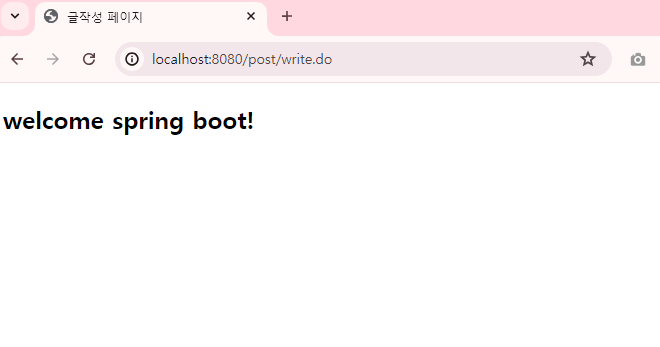
HTML 화면 만들기
컨트롤러에서 return 해준 html 파일 경로에 맞춰 파일을 생성하고 (기본적으로 templates 폴더 내) 코드 작성
<!DOCTYPE html>
<html lang="ko">
<head>
    <meta charset="UTF-8">
    <title>글작성 페이지</title>
</head>
<body>
<h2>welcome spring boot!</h2>
</body>
</html>
실행시키면 페이지가 잘 뜨는 것을 확인 할 수 있다.
화면으로 데이터 값 전달하기
Model 인터페이스의 addAttribute( ) 메서드를 이용하여 화면에 데이터 전달!
데이터를 전달하기 위해 컨트롤러 수정하기
// 게시글 작성 페이지
@GetMapping("/post/write.do")
public String openPostWrite(Model model) {
    String title = "제목",
            content = "내용",
            writer = "홍길동";

    model.addAttribute("t", title);
    model.addAttribute("c", content);
    model.addAttribute("w", writer);
    return "post/write";
}
전달받은 데이터를 화면에 출력하기 위해 HTML 수정하기 - 타임리프 이용
<!DOCTYPE html>
<html lang="ko" xmlns:th="http://www.thymeleaf.org">
<html lang="ko">
<head>
    <meta charset="UTF-8">
    <title>글작성 페이지</title>
</head>
<body>
    <h2>welcome spring boot!</h2>
    <span th:text="${t}">제목입니다.</span>
    <span th:text="${c}">내용입니다.</span>
    <span>[[ ${w} ]]</span>
</body>
</html>
※ th:text 속성 : ${ } 표현식을 이용해 컨트롤러에서 전달받은 데이터에 접근한다. JSTL, EL 표현식과 유사

CSS 레이아웃 적용하기
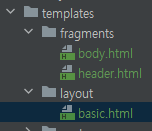
공통 레이아웃 적용
1) 타임리프 레이아웃 기능을 사용하기 위한 라이브러리 추가
implementation 'nz.net.ultraq.thymeleaf:thymeleaf-layout-dialect' /* Thymeleaf Layout */
2) resources/templates폴더에 fragments와 layout 폴더 추가, fragments에 header와 body html 파일 추가 후 작성
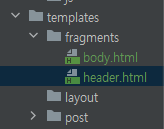
header.html
<!DOCTYPE html>
<html lang="ko" xmlns:th="http://www.thymeleaf.org" xmlns:layout="http://www.ultraq.net.nz/thymeleaf/layout">
<head th:fragment="main-head">
    <meta http-equiv="Content-Type" content="text/html; charset=utf-8" />
    <meta http-equiv="X-UA-Compatible" content="IE=Edge" />

    <th:block layout:fragment="title"></th:block>

    <link rel="stylesheet" th:href="@{/css/default.css}" />
    <link rel="stylesheet" th:href="@{/css/common.css}" />
    <link rel="stylesheet" th:href="@{/css/content.css}" />
    <link rel="stylesheet" th:href="@{/css/button.css}" />

    <th:block layout:fragment="add-css"></th:block>
</head>
</html>
body.html
<!DOCTYPE html>
<html lang="ko" xmlns:th="http://www.thymeleaf.org" xmlns:layout="http://www.ultraq.net.nz/thymeleaf/layout">
<body th:fragment="main-body">
    <div id="adm_wrap">
        <header>
            <div class="head">
                <h1>게시판 프로젝트</h1>
                <div class="top_menu">
                    <div class="login_user"><strong><i class="far fa-user-circle"></i> 얼뚱</strong>님 반갑습니다.</div>
                    <div class="logout"><button type="button"><span class="skip_info">로그아웃</span><i class="fas fa-sign-out-alt"></i></button></div>
                </div>
            </div>
        </header>

        <div id="container">
            <div class="menu_toggle"><span></span></div>
            <!--/* 좌측 영역 */-->
            <div class="lcontent">
                <!--/* 메뉴 */-->
                <nav>
                    <ul>
                        <li class="has_sub"><a href="javascript: void(0);" class="on"><span>게시판 관리</span></a>
                            <ul>
                                <li><a href="/post/list.do" class="on">리스트형</a></li>
                                <li><a href="javascript: alert('준비 중입니다.');">갤러리형</a></li>
                                <li><a href="javascript: alert('준비 중입니다.');">캘린더형</a></li>
                            </ul>
                        </li>
                        <li><a href="javascript: alert('준비 중입니다.');"><span>회원 관리</span></a></li>
                    </ul>
                </nav>
            </div>

            <!--/* 우측 영역 */-->
            <div class="rcontent">

                <!--/* 페이지별 컨텐츠 */-->
                <th:block layout:fragment="content"></th:block>

            </div>
        </div> <!--/* // #container */-->
        <footer>Copyright(c)네임즈.All rights reserved.</footer>
    </div>

    <script th:src="@{/js/function.js}"></script>
    <script th:src="@{/js/jquery-3.6.0.min.js}"></script>
    <script th:src="@{/js/common.js}"></script>
    <script src="https://kit.fontawesome.com/79613ae794.js" crossorigin="anonymous"></script>
    <script src="https://cdn.jsdelivr.net/npm/dayjs@1/dayjs.min.js"></script>

    <th:block layout:fragment="script"></th:block>
</body>
</html>
3) fragment를 적용하도록 글쓰기 페이지 코드 변경
write.html
<!DOCTYPE html>
<html lang="ko" xmlns="http://www.w3.org/1999/xhtml" xmlns:th="http://www.thymeleaf.org">
<head th:replace="fragments/header :: main-head"> </head>
<body th:replace="fragments/body :: main-body"> </body>
</html>
4) 레이아웃 인클루드(include) 하기
header 와 body html 파일은 모든 페이지에서 공통으로 사용될 것이기 때문에 layout으로 적용시켜주어야 한다.
우선 미리 만들었던 layout 폴더 아래에 basic.html을 만들고 write.html 코드를 복사하여 붙여넣는다.
그 다음 글쓰기 페이지(write.html)에서 해당 layout을 include 하도록 코드를 수정해준다.
<!DOCTYPE html>
<html lang="ko" xmlns:th="http://www.thymeleaf.org"
xmlns:layout="http://www.ultraq.net.nz/thymeleaf/layout" layout:decorate="layout/basic">
<th:block layout:fragment="title">
    <title>글작성 페이지</title>
</th:block>
</html>
아래는 아까 작성한 fragments/body.html에 있던 코드 중 일부인데
페이지 별 실제 컨텐츠가 들어가는 영역으로,
th:block layout:fragment 속성에 이름을 지정해주어 해당 이름을 가진 페이지가 보이도록 하는 것이다. 글쓰기 페이지면 글쓰기 페이지에 필요한 컨텐츠, 글쓰기 목록 페이지면 그것에 맞는 컨텐츠로 채워지는 것.

다시 write.html 코드를 보면 얘는 속성을 title 로 주었는데, 이를 이용하여 레이아웃 부분의 제목을 페이지마다 다르게 처리할 수 있다.
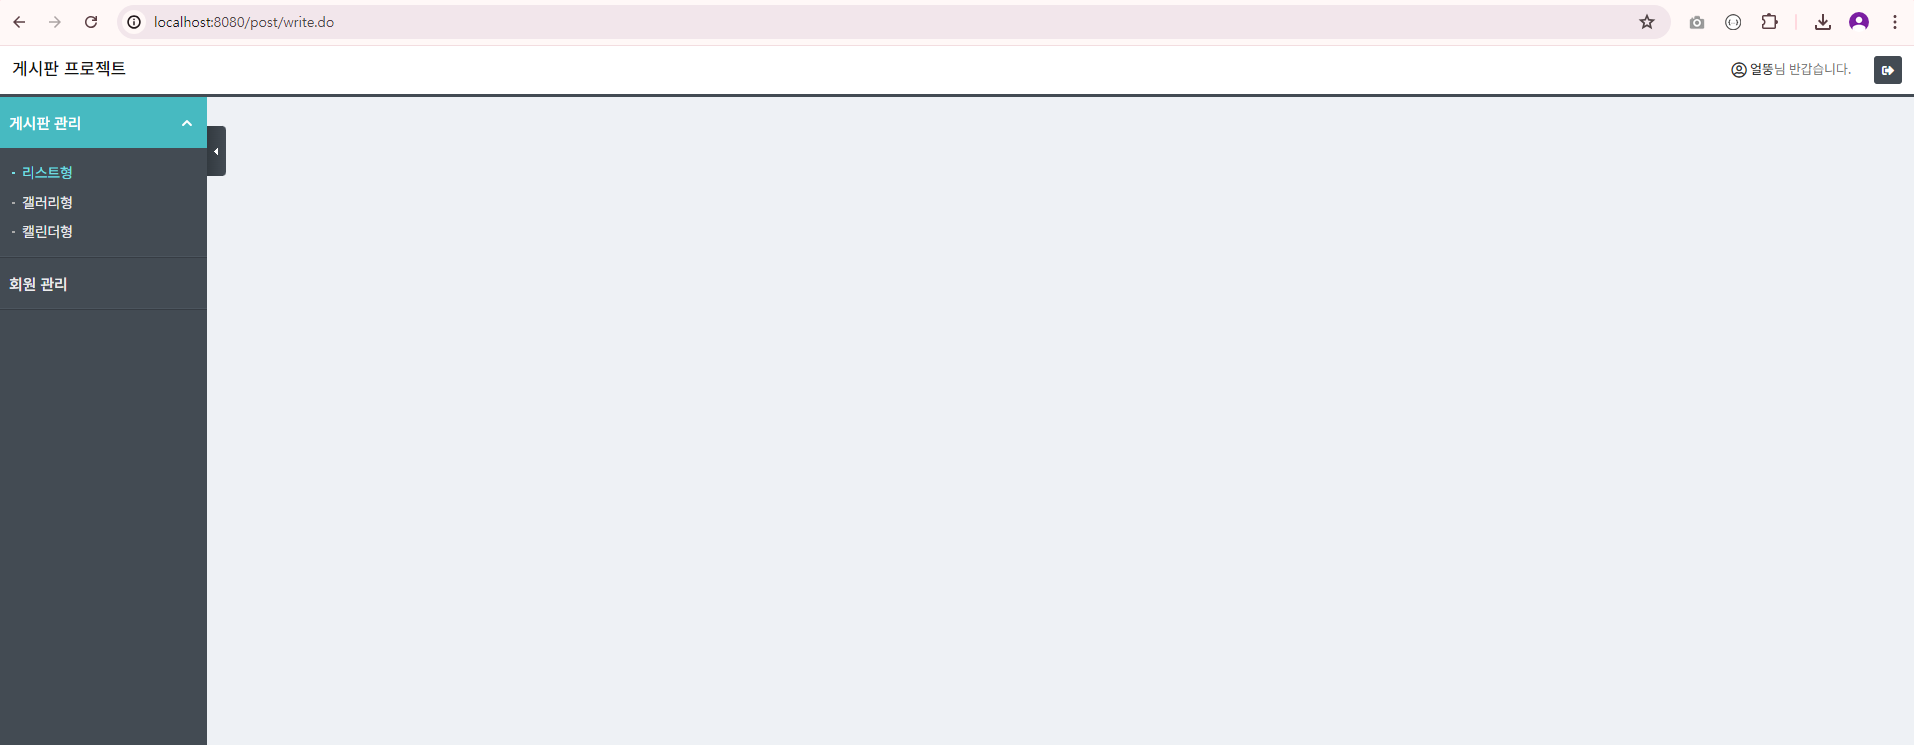
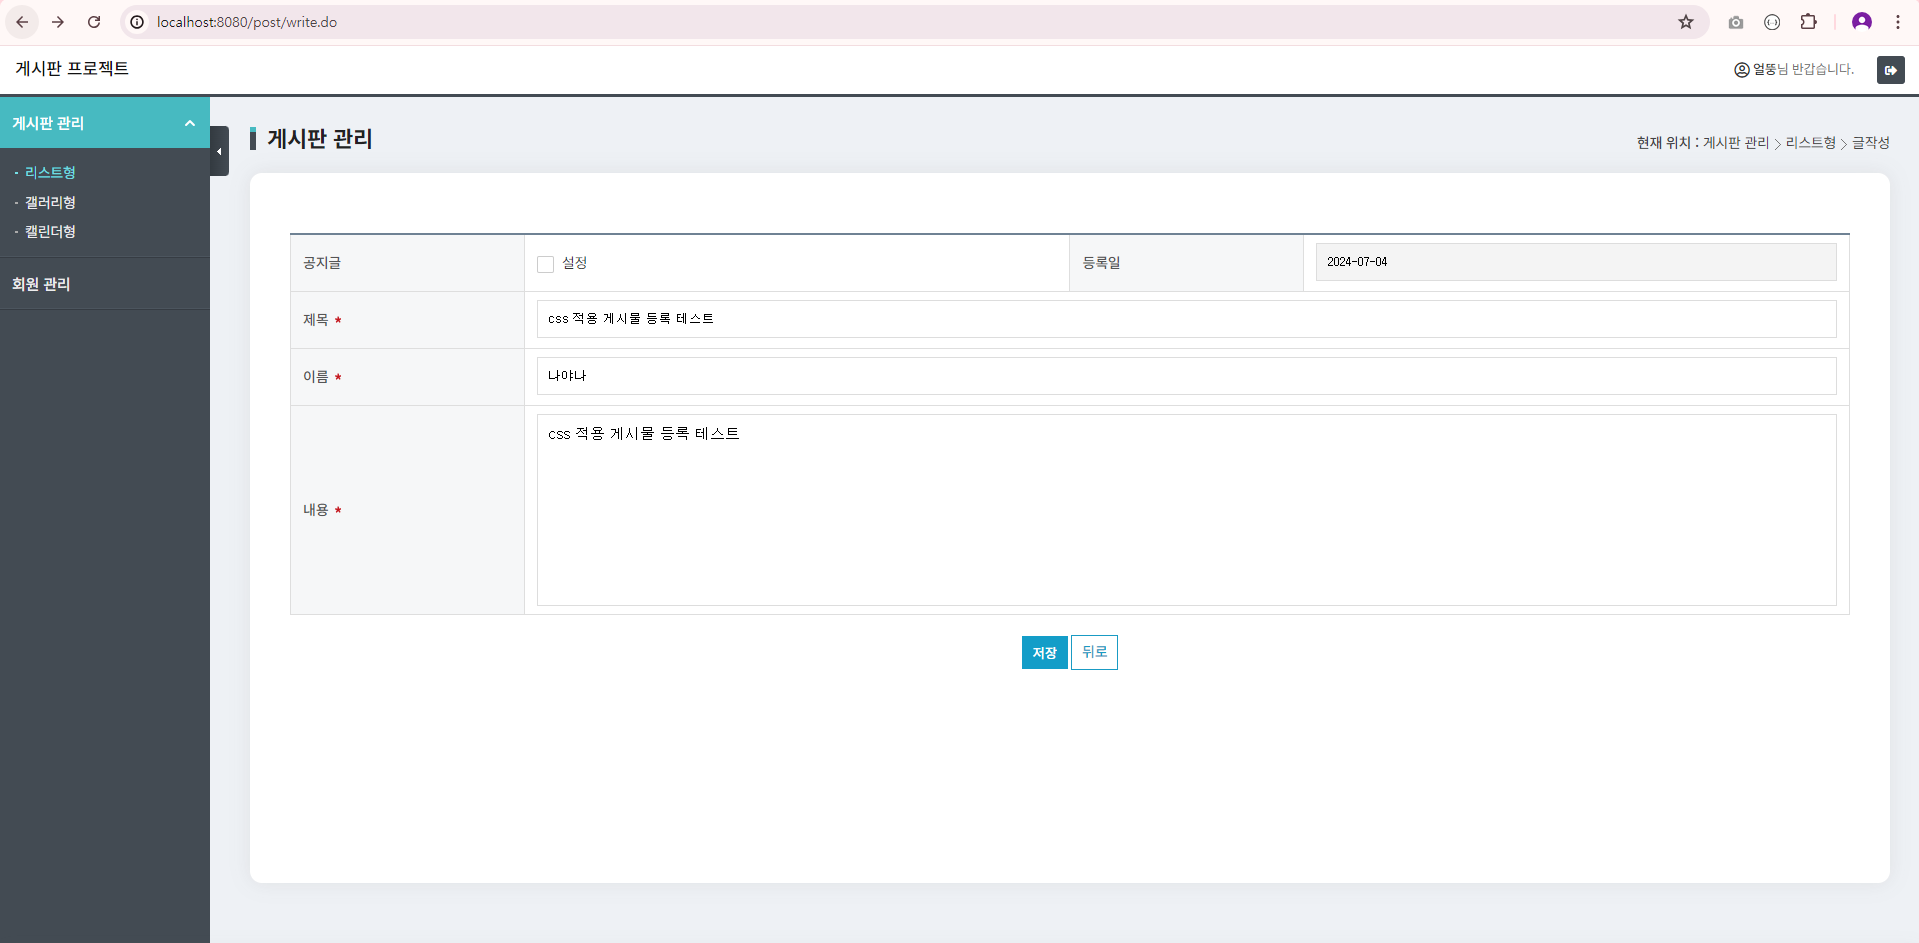
글 작성 페이지 처리하기
PostController의 openPostWrite() 메서드 수정하기
// 게시글 작성 페이지
@GetMapping("/post/write.do")
public String openPostWrite(@RequestParam(value = "id", required = false) final Long id, Model model) {
    if (id != null) {
        PostResponse post = postService.findPostById(id);
        model.addAttribute("post", post);
    }
    return "post/write";
}
@RequestParam 을 통해 화면(html)에서 보낸 파라미터를 전달 받는다. 신규 게시글이 등록될 경우에는 null 값이지만, 이미 등록된 게시글을 수정하는 경우에는 해당 게시글의 id 값을 파라미터로 전달 받아 그 id를 이용해 글 상세 정보를 조회하여 화면으로 다시 전달한다.
required 속성 default 값은 true 이기 때문에 만약 id 값이 null 일 시에 예외가 발생한다. 신규 게시글을 등록할 때는 id 값을 조회할 필요가 없으니 false로 지정해준다.
정리하면, 게시글 id를 파라미터로 전달받은 경우(사용자가 글을 수정할 때) 게시글 번호(id)를 이용하여 조회한 상세 정보(response 객체)를 post라는 이름으로 화면에 전달하는 코드이다.
글 작성 페이지 컨텐츠 영역 구성하기
write.html
<!DOCTYPE html>
<html lang="ko" xmlns:th="http://www.thymeleaf.org" xmlns:layout="http://www.ultraq.net.nz/thymeleaf/layout" layout:decorate="layout/basic">
<th:block layout:fragment="title">
<title>글작성 페이지</title>
</th:block>
<th:block layout:fragment="content">
<div class="page_tits">
<h3>게시판 관리</h3>
<p class="path"><strong>현재 위치 :</strong> <span>게시판 관리</span> <span>리스트형</span> <span>글작성</span></p>
</div>
<div class="content">
<section>
<form id="saveForm" method="post" autocomplete="off">
<!--/* 게시글 수정인 경우, 서버로 전달할 게시글 번호 (PK) */-->
<input type="hidden" id="id" name="id" th:if="${post != null}" th:value="${post.id}" />
<!--/* 서버로 전달할 공지글 여부 */-->
<input type="hidden" id="noticeYn" name="noticeYn" />
<table class="tb tb_row">
<colgroup>
<col style="width:15%;" /><col style="width:35%;" /><col style="width:15%;" /><col style="width:35%;" />
</colgroup>
<tbody>
<tr>
<th scope="row">공지글</th>
<td><span class="chkbox"><input type="checkbox" id="isNotice" name="isNotice" class="chk" /><i></i><label for="isNotice"> 설정</label></span></td>
<th scope="row">등록일</th>
<td colspan="3"><input type="text" id="createdDate" name="createdDate" readonly /></td>
</tr>
<tr>
<th>제목 <span class="es">필수 입력</span></th>
<td colspan="3"><input type="text" id="title" name="title" maxlength="50" placeholder="제목을 입력해 주세요." /></td>
</tr>
<tr>
<th>이름 <span class="es">필수 입력</span></th>
<td colspan="3"><input type="text" id="writer" name="writer" maxlength="10" placeholder="이름을 입력해 주세요." /></td>
</tr>
<tr>
<th>내용 <span class="es">필수 입력</span></th>
<td colspan="3"><textarea id="content" name="content" cols="50" rows="10" placeholder="내용을 입력해 주세요."></textarea></td>
</tr>
</tbody>
</table>
</form>
<p class="btn_set">
<button type="button" id="saveBtn" onclick="savePost();" class="btns btn_st3 btn_mid">저장</button>
<a th:href="@{/post/list.do}" class="btns btn_bdr3 btn_mid">뒤로</a>
</p>
</section>
</div> <!--/* .content */-->
</th:block>
<th:block layout:fragment="script">
<script th:inline="javascript">
/*<![CDATA[*/
window.onload = () => {
initCreatedDate();
}
// 등록일 초기화
function initCreatedDate() {
document.getElementById('createdDate').value = dayjs().format('YYYY-MM-DD');
}
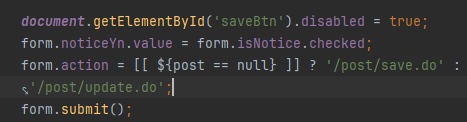
// 게시글 저장(수정)
function savePost() {
const form = document.getElementById('saveForm');
const fields = [form.title, form.writer, form.content];
const fieldNames = ['제목', '이름', '내용'];
for (let i = 0, len = fields.length; i < len; i++) {
isValid(fields[i], fieldNames[i]);
}
document.getElementById('saveBtn').disabled = true;
form.noticeYn.value = form.isNotice.checked;
form.action = [[ ${post == null} ]] ? '/post/save.do' : '/post/update.do';
form.submit();
}
/*]]>*/
</script>
</th:block>
</html>
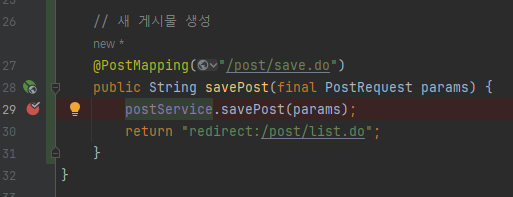
게시글 등록 메서드 추가
PostController에 게시글 등록하는 savePost() 메서드를 추가해준다.
// 새 게시물 생성
@PostMapping("/post/save.do")
public String savePost(final PostRequest params) {
    postService.savePost(params);
    return "redirect:/post/list.do";
}
아래 코드를 보면 write.html에서 action 폼으로 save.do와 update.do url을 지정해주었으니, Controller에 게시물 생성 url을 이에 맞춰 작성하여 연결해준다.
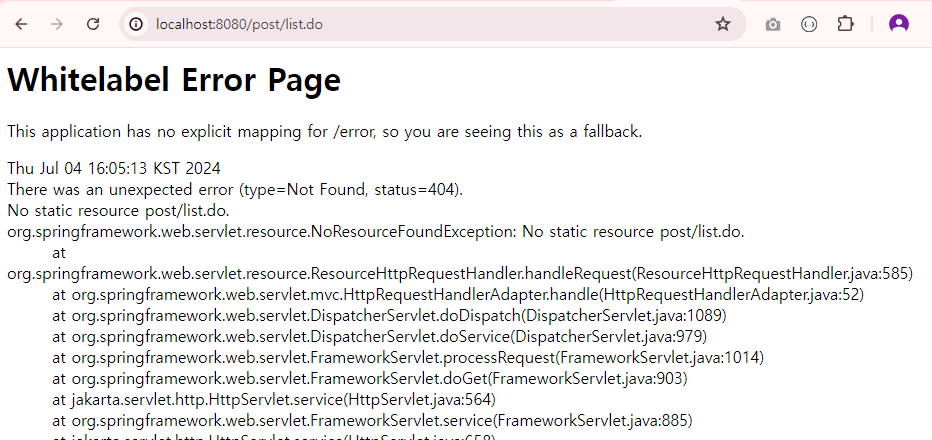
내용들을 작성하고 저장하면 404 에러가 뜨게 된다.
그 이유는 게시물이 저장될 시 /post/list.do url로 redirect 되도록 설정 했는데,
해당 url에 매핑되는 메서드가 아직 없기 때문!
대신 데이터는 db에 잘 저장된 것을 확인할 수 있다.

이전에 테스트로 생성했던 데이터가 잔뜩 쌓였어서 데이터를 몽땅 삭제했다. 특정 데이터를 삭제하려면 꼭 WHERE을 사용하여 조건을 붙여주어야 함.
// 테이블의 모든 데이터 삭제 (테이블 삭제 명령어는 DROP)
DELETE FROM 테이블이름;
auto_increment를 사용하기 때문에 데이터를 다 삭제하고 새로 데이터를 생성해도 id 값이 초기화 되지 않았다.
무슨 상관이 있는 건 아니지만 괜히 새로 시작하고 싶어서.. 1로 초기화 시켜주었다.
// auto_increment 값이 지정해준 특정 값으로 시작하게 된다.
// 주의할 점은 테이블에서 이 지정해준 값보다 더 큰 값을 가진 데이터가 있으면 안된다는 것
ALTER TABLE `테이블이름` AUTO_INCREMENT = 1;
디버깅 해보기
데이터가 잘 들어오는 지 확인해보고 싶으니 디버깅을 해보자!

우선 debug 모드로 애플리케이션을 실행 시키자. 실행 파일을 우클릭해서 Debug 목록을 선택하거나, 상단에 벌레 모양의 아이콘을 클릭하면 디버그 모드로 실행이 된다.
그 다음 객체가 담기는지 확인하고 싶은 라인을 클릭하여 브레이크 포인트를 잡은 뒤에 메서드를 실행시키는 액션을 취해본다. 나는 게시물을 생성하는 메서드이기 때문에 이 상태에서 실제로 글을 등록 해보는 것이다.
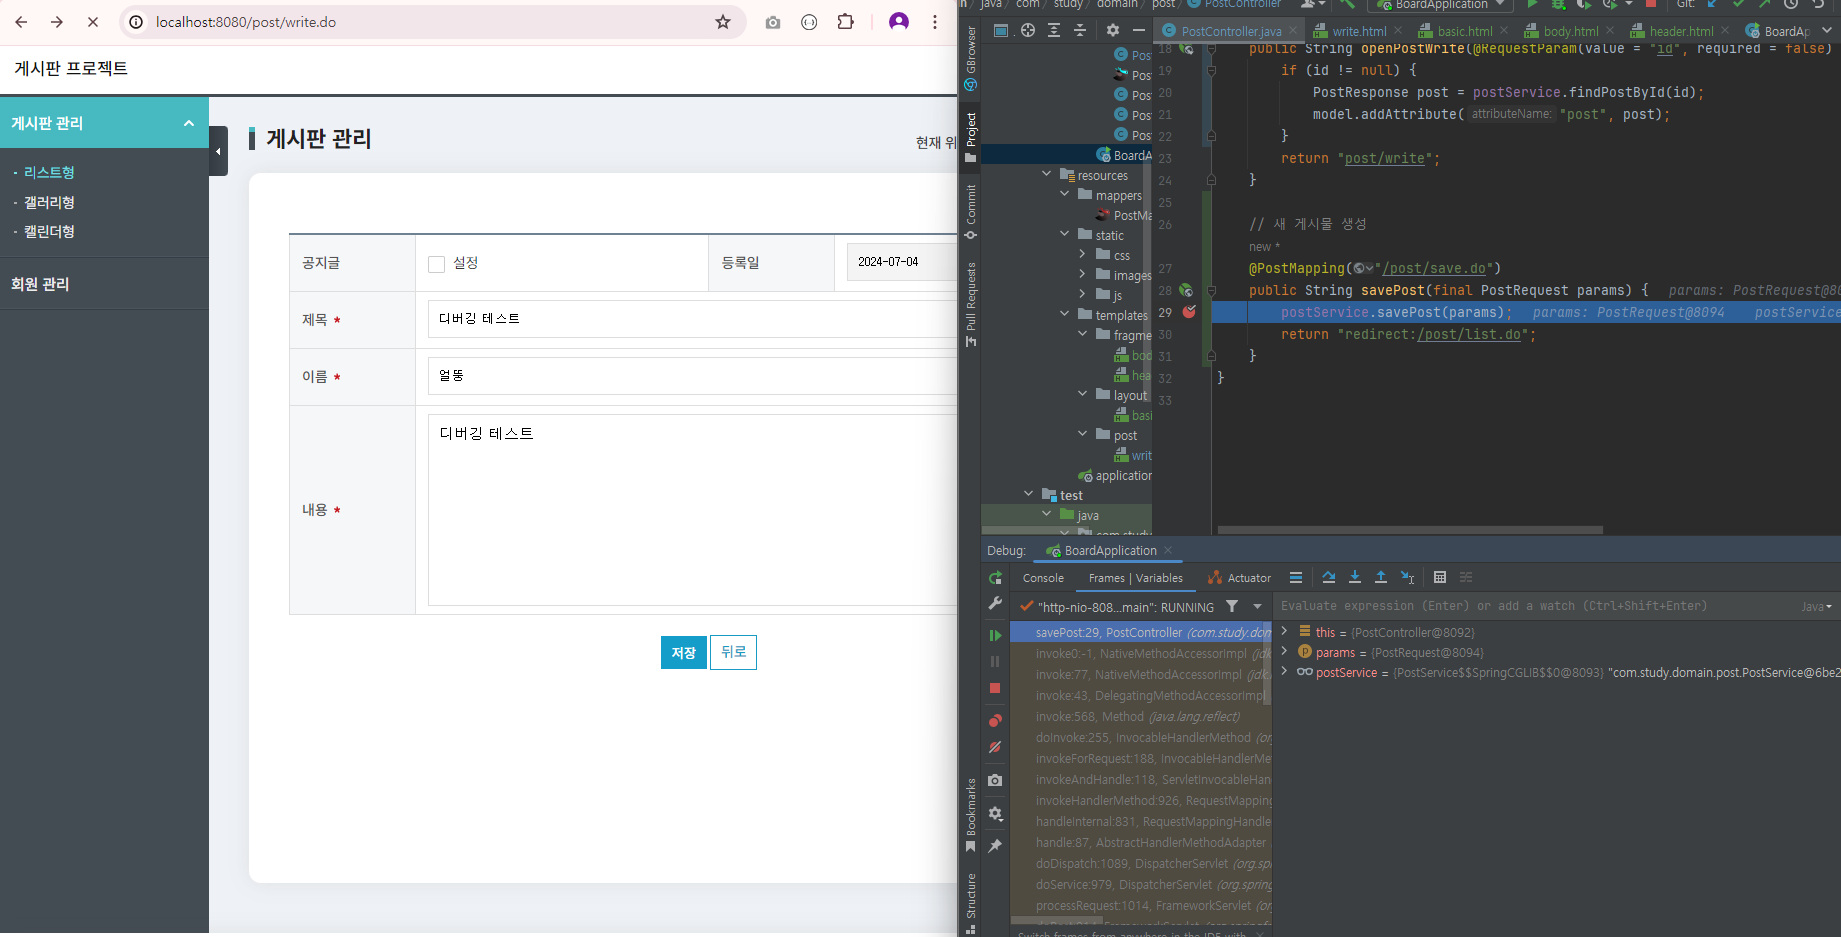
작성 버튼을 누르면 웹 화면이 멈추고 해당 라인이 활성화 되면서 담긴 객체 정보가 출력이 된다.
끝~~
모든 코드는 아래 블로그를 참고합니다!
스프링 부트(Spring Boot) 게시판 - 게시글 등록 기능 구현하기 [Thymeleaf, MariaDB, IntelliJ, Gradle, MyBatis]
본 게시판 프로젝트는 단계별(step by step)로 진행되니, 이전 단계를 진행하시는 것을 권장드립니다. DBMS 툴은 DBeaver를 이용하며, DB는 MariaDB를 이용합니다. (MariaDB 설치하기) 화면 처리는 HTML5 기반
congsong.tistory.com
'SpringBoot 게시판 프로젝트' 카테고리의 다른 글
| 스프링부트(SpringBoot) 게시판 만들기 (6) - 게시글 상세 정보 조회/ 수정 기능 구현 (0) | 2024.07.04 |
|---|---|
| 스프링부트(SpringBoot) 게시판 만들기 (5) - 게시글 목록 조회 기능 구현 (0) | 2024.07.04 |
| 스프링부트(SpringBoot) 게시판 만들기 (3) - CRUD 쿼리 작성 (2) | 2024.07.03 |
| 스프링부트(SpringBoot) 게시판 만들기 (2) - DB 연결 (0) | 2024.07.02 |
| [IntelliJ / Github] IntelliJ + Github 연동하기 (0) | 2024.07.01 |